Ionic App with Watson Visual Recognition
The following are setup instructions for Raymond Camden’s Blog about creating a Bluemix enabled Ionic mobile app.
Setup
Follow the below instructions to get your environment setup for working with Bluemix and Ionic.
-
You will need the mobile SDKs for Android or iOS. If you do not have one installed then grab the Android SDK and get its install going right away (this will take… a while)
Install the Android Studio
#or
Get the Android SDK zip
-
Sign up with Bluemix so that we can use the Visual Recognition service.
-
Download the Cloud Foundry command line interface.
This can be run in OSX Terminal or Win Command Prompt (Cygwin not supported). You will need to restart your terminal or cmd window after the install (so that it gets the updated environment).cf api https://api.ng.bluemix.netcf login -
Node will need to be installed so that you can use npm
-
Install Cordova and Ionic. NOTE! If you are using a Mac you should put
sudoin front of the below command.npm install -g cordova ionic -
Get the code for the workshop. If you already have git installed this is easy:
git clone https://github.com/pwcremin/IonicWatsonDemoIf you don’t then simply download the zip from here
After cloning or unzipping you should now have a directory named IonicWatsonDemo with the code
-
Install the node packages for the demo
cd IonicWatsonDemo/servernpm installcd ..just to get back to the root dir
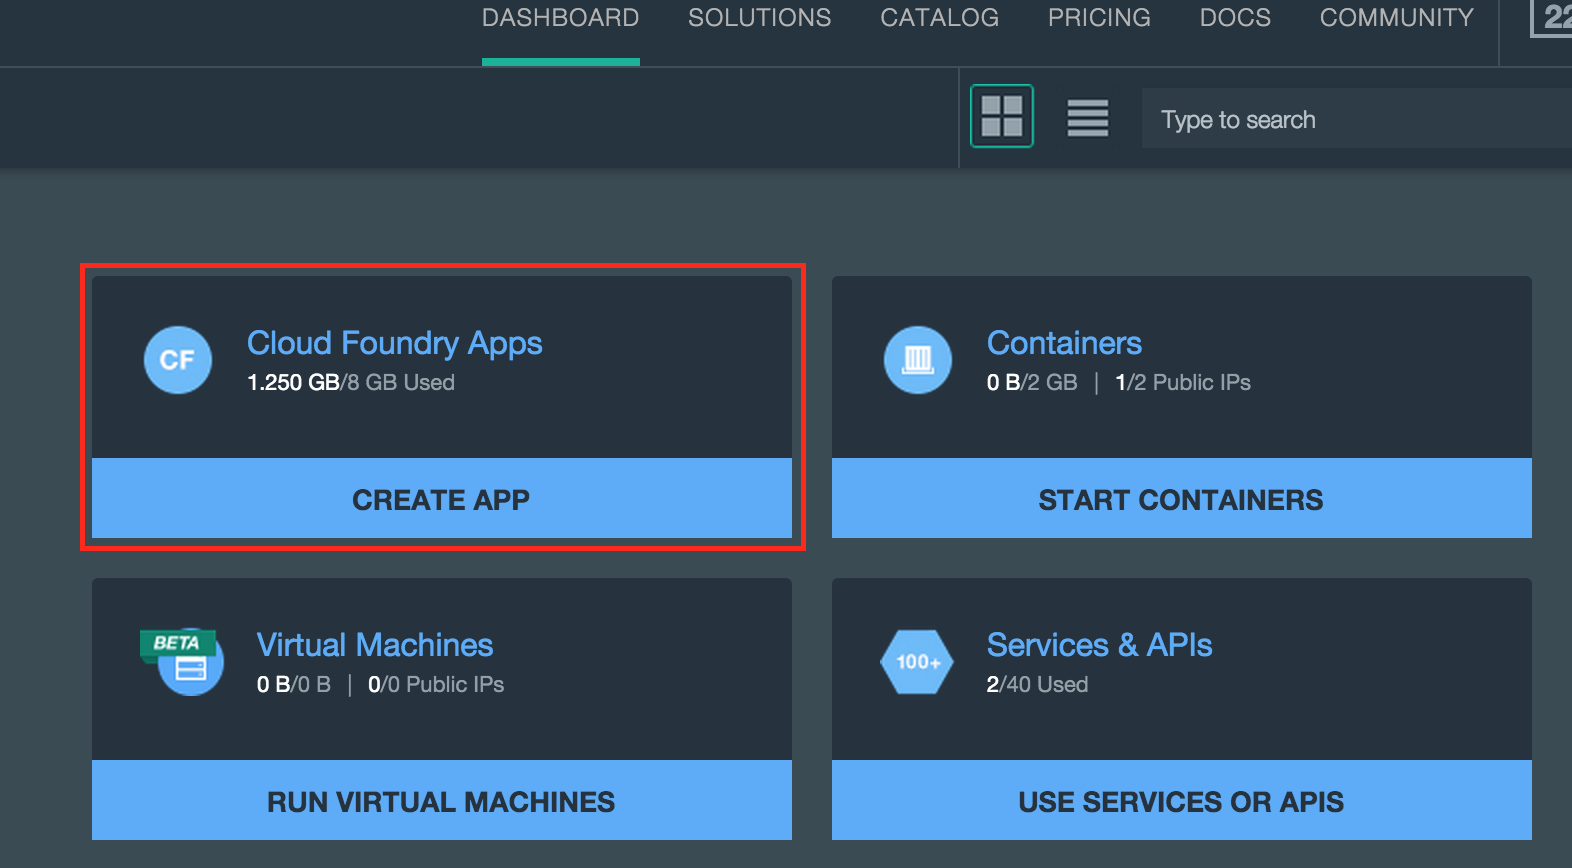
Create your Bluemix app and bind the Visual Recognition service
Log into Bluemix, go to your Dashboard, and then select the Create App option.
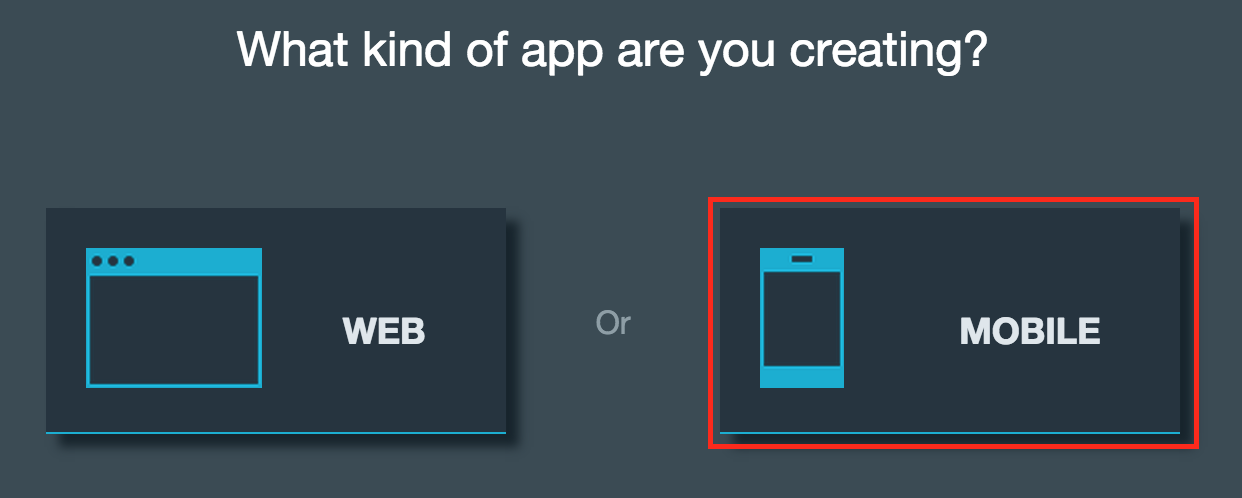
We are creating a mobile app (duh), so select Mobile
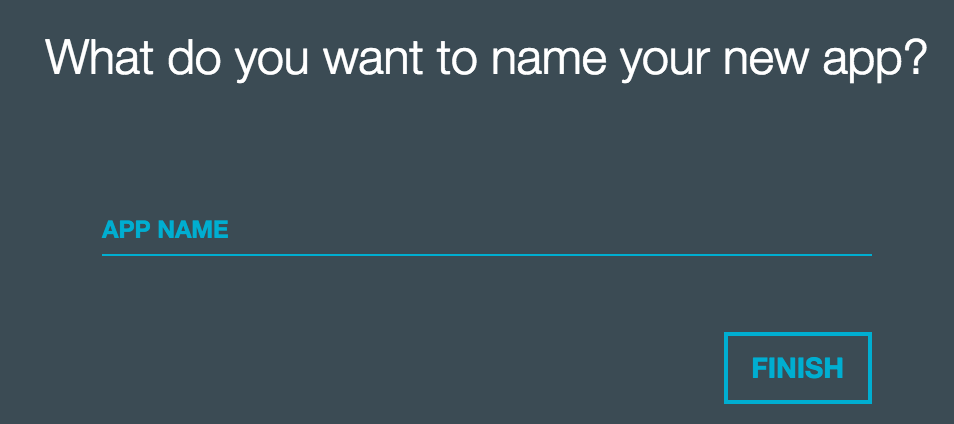
Now, it is important that your app name is unique (meaning no other app in Bluemix can have that name). This tends to be a confusing step for some reason, but we can do it! Your name plus about 4 random numbers should do it. For example FightingIrish-8374 (don’t use that… its an example).
It will take a few minutes for your app to be created. Use this time to say hello to your neighbor.
At this point your app is created. You will be asked to setup authentication, but that is outside the scope of this workshop so don’t worry about it.
Select the arrow in the top left corner, and lets check out your app
![]()
Ok, cool so we have an app in Bluemix. What does this even mean?
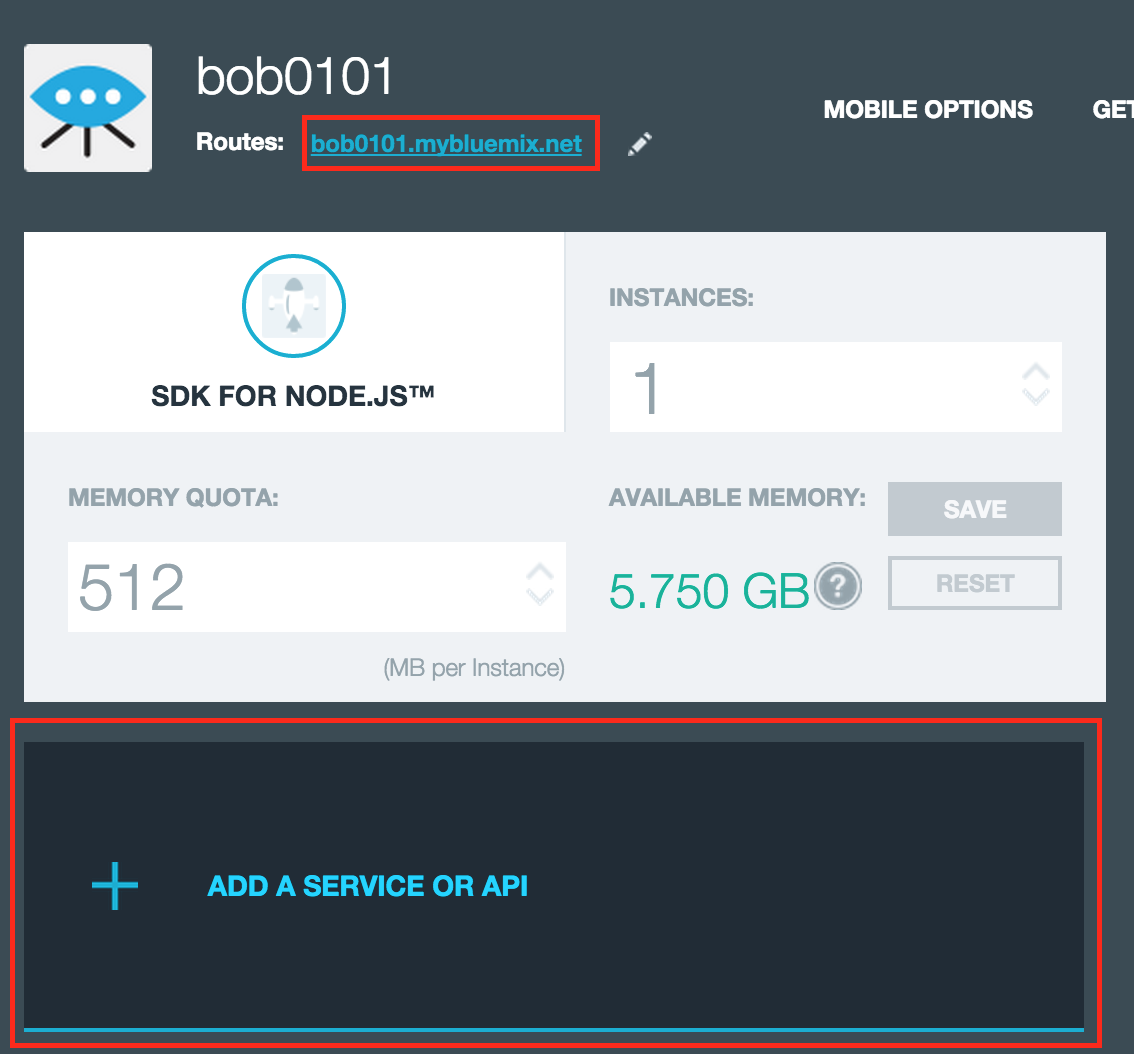
When you create a mobile application, multiple services are provisioned under a single application context. A server-side application is also provisioned so that you can provide server-side functions, such as resource URIs and static files.
For instance, the app that you just created has a Node runtime. It is running some boilerplate code for now, but you can see that your server is running by clicking on the route that was created for your app (highlighted below).
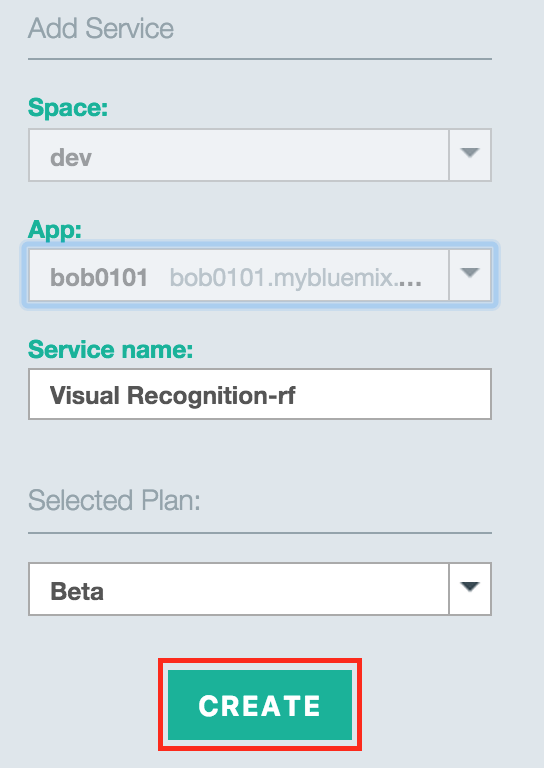
Now we want to add the Visual Recognition service to your app, so click “ADD A SERVICE OR API”
You might have to do some searching here, but once you find the Visual Recognition service, click on it

And create
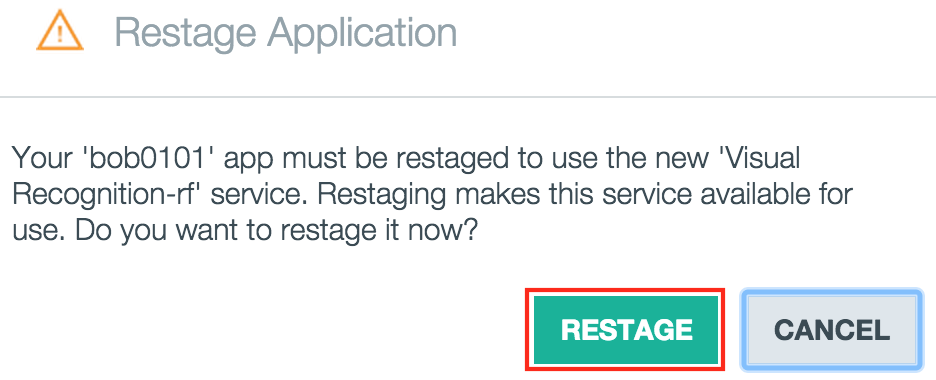
After you creat the service, you will be prompted to “restage” your app. Go ahead and do this. All it means is that your app will be brought down and then back up. This will update the environment with the details for the new service you just added.
Enough horsing around. Lets write some code
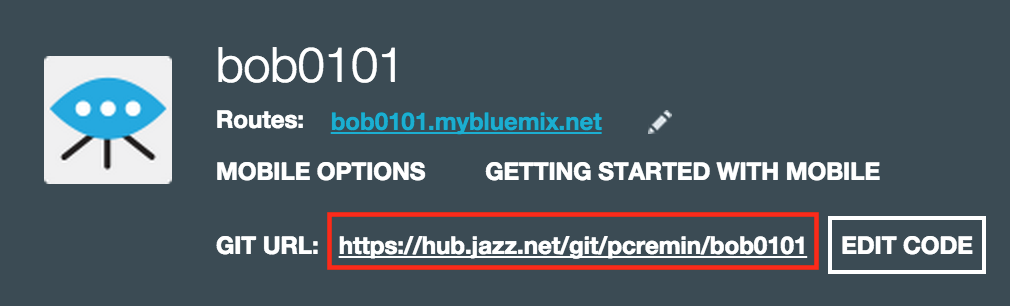
Click on ‘Overview’ on the far left so that we can get back to our app. We want to add git, grab the boilerplate code, and start making some changes.
(If you are requested for you user info again, and that fails, then log out and in again)

After a few clicks your git repo will be created. Click on the git url and we will be taken to DevOps services where we can edit our server code.
Now click on the big “Edit Code” button. Its so big I don’t even need to show you a picture of it! We can now see, and edit, our server. Before we do that though, lets prove that it is running. Click on the “open application” button. This will start a new tab that goes to your route.

We are about to start changing this code so that it does something interesting. Enable “Live Edit” so that we can do this without waiting 5 minutes for a full deploy after each change.
Live Edit: You can make changes to a Node.js application running in Bluemix and test them in your browser right away. Any changes that you make in a synchronized desktop directory or in the Web IDE are propagated to the application’s file system immediately.

The message that you saw after opening your app is nothing more than the html in your public/index.html. Open this file up and you see some generic text. Make some changes to it… maybe a statement on your love for boy bands or Bob Hope. After that you can go back to your webpage and see the sweet changes.
We don’t care about Bob Hope, we want to upload a file to our server and send it to Watson. Blow away whatever is in public/index.html and put this html in there instead
<form action="/uploadpic" method="POST" enctype="multipart/form-data">
  *in a robot voice* Select image to upload!<br>
  <input type="file" name="image">
  <input type="submit" value="Upload Image">
</form>
We need to add 2 more packages to our server; formidable for file uploads, and watson-developer-cloud for Visual Recognition. Update your package.json with this
{
	"name": "MobileBackendStarterApp",
	"version": "0.0.1",
	"description": "A template Mobile Backend application",
	"dependencies": {
		"express": "4.*",
		"passport": "*",
		"passport-imf-token-validation": "*",
		"imf-oauth-user-sdk": "*",
		"watson-developer-cloud": "*",
		"formidable": "*"
	},
	"engines": {
		"node": "0.10.26"
	},
	"repository": {},
	"scripts": {
	  "start": "node app.js"
	}
}
The. go ahead and redeploy so that the new packages will be installed by npm

Using Watson Visual Recognition
In the project listing click on the app.js file. This is the entry point for our Node Express server.
Copy the below code and paste it in at line 52. This creates a new route for us that will send the uploaded file to our Visual Recognition service for analysis.
var formidable = require('formidable');
var watson = require('watson-developer-cloud');
var fs = require('fs');

var visual_recognition = watson.visual_recognition({
    version: 'v1',
    use_vcap_services: true
});

app.post('/uploadpic', function(req, result) {

    var form = new formidable.IncomingForm();
    form.keepExtensions = true;

    form.parse(req, function(err, fields, files) {
        var params = {
            images_file: fs.createReadStream(files.image.path)
        };

        visual_recognition.recognize(params, function(err, res) {
            if (err)
                result.send(err);
            else {
                var labels = res.images[0].labels.map(function(label)
                {
                    return label.label_name;
                });

                result.send(labels);
            }
        });

    });
});
Go to your webpage and lets upload an image again. Make sure to pick a photo and not a graphic or drawing. Watson will respond with a list of labels that it thinks fits the photo you uploaded.
Build an Ionic app to hit your server
-
Lets create our Ionic mobile project. Make sure you are in the
/IonicWatsonDemorootionic start mymobileapp ./mobile/wwwcd mymobileapp -
Let Ionic know what platform you are using (this install could take a few minutes)
ionic platform add [ios|android] -
Get the cordova plugings that you will need for the workshop
cordova plugin add cordova-plugin-cameracordova plugin add cordova-plugin-file-transfer
Really getting into the anotomy of an Ionic app is a bit outside the scope of this workshop. However, the code you grabbed from git is for a single page Ionic app, and it contains no nagivation, which makes things a bit simpler.
If you open up www/index.html, you will see that your javascript is loaded from www/js/app.js, and this is the main code file for your application.
    <!-- LN:15 www/index.html -->
    <script src="js/app.js"></script>
  </head>
Now open up www/js/app.js. If you take a look at line 35, you will see that your app is currently hitting localhost.
    // LN:35 www/js/app.js
    ft.upload(fileUri, "http://localhost:3000/uploadpic", function(r) {
But hey! We have a running server in the cloud. Lets hit that instead. Update this line of code to hit your app’s route Don’t forget to get rid of the port… just need the route. Here is an example
    // LN:35 www/js/app.js
ft.upload(fileUri, "http://boomersooner.mybluemix.net/uploadpic", function(r) {- For you xcode users, iOS 9 forces you to use https. We want to block that for our little tutorial.
In xcode open platforms/ios/HelloCordova.xcodeproj. Once the project is open, right click on Resources/HelloCordova-Info.plist
and select ‘Open as -> Source Code’. You want to edit this puppy and add the below under the first
<dict>.
<key>NSAppTransportSecurity</key>
<dict>
  <!--Include to allow all connections (DANGER)-->
  <key>NSAllowsArbitraryLoads</key>
      <true/>
</dict>
It will look something like this after the insert
<?xml version="1.0" encoding="UTF-8"?>
<!DOCTYPE plist PUBLIC "-//Apple//DTD PLIST 1.0//EN" "http://www.apple.com/DTDs/PropertyList-1.0.dtd">
<plist version="1.0">
<dict>
    <key>NSAppTransportSecurity</key>
    <dict>
        <!--Include to allow all connections (DANGER)-->
        <key>NSAllowsArbitraryLoads</key>
        <true/>
</dict>- Now run your project from xcode and watch your mobile app connect to your Bluemix hosted server!